Egg Coloring- Part Two
Silk- Tie Eggs
This project was a little more tricky and Allexxa didn't really get involved much except for unwrapping the eggs at the very end. I do have to say these turned out incredible and they seem to be addicting!
Ok, for this project you will need 100% silk fabric. I used ties that I got from the thrift store, but you could use blouses or scarves or any such nonsense, as long as it is 100% silk.
All you need is the fabric itself so if you use ties, you will need to rid yourself of the lining and other fabric. A short photo walk-through of deconstructing a tie folows:
You then take RAW EGGS, and wrap them up in in the silk with the "good side" facing the egg, securing it with a twist tie. The pattern is going to transfer where the silk is actually touching the egg, so think about where you want the clearest pattern to be. I chose the horizontal orientation so that the bulk of the pattern was on the largest portion of the egg. You choose what you like best!
After they are all wrapped in their silk jammies, you will need to cover those with a thin light colored material. I used a Dollar Tree tee-shirt that I cut into squares. To secure it, rubber-bands worked the best for me, as the twist ties I had were too small.
Once they are all double wrapped you want to place them in a pan filling it with cold water to cover the eggs. (Note: the "tails" will probably be sticking out) Then add 1/4 cup of white vinegar and bring to a boil.
Boil them for 20 minutes, then remove them with tongs and place on a towel or wire rack to cool.
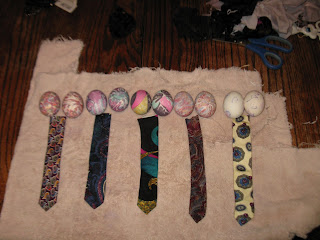
Once they are cool enough to handle, you can unwrap them! This is by far the most addicting part! Below are the eggs we colored with a piece of the tie that was used underneath. The eggs on the left of each pair have the "right side" or the smooth side of the silk up. The eggs on the right side of the pair have the twist-tie side up.
These are a couple of my favorites up close!
Hope you have as much fun with this as i did! Good luck and I hope everyone has a wonderful Spring!


