Tuesday, June 12, 2012

Single Serving Apple Crisp

I made these for Lexxa's teachers for Teacher Appreciation week.

I decided to go with a picnic-y springtime theme for these.  (it helped that the decorations were on sale at Michael's.)  All you really need for the jars is canning jars, some fabric (the fabric i used was some scrap fabric I had in my fabric bin) and any decorations you want for the outside of the lid.  I chose some flower appliques and ribbon.  A glue gun works best to keep everything in it's place!


And for the internal workings of the apple crisp itself, you will need:

 For the gooey goodness:
4 short, half-pint glass canning jars*
3 1/2 cups (7-10 whole) apples, peeled and thinly sliced
2 tablespoons lemon juice
1/2 cup white sugar
2 Tbsp brown sugar
2 Tbsp all-purpose flour
1/2 teaspoon ground cinnamon
1/8 teaspoon ground nutmeg


The apples should be washed peeled and chopped into thin chunks. Toss with the lemon juice.

Then mix the other ingredients in a small bowl.


The next step is mixing it all together!
 

When I did this project I used 3 jars and filled them 2/3 of the way full and had plenty of extra to make a regular apple crisp for the house.  If I was to do it again, I would fill them almost all the way full, as they cook down quite a bit!
 

This is what was left over... plenty to fill the jars up all the way and still have enough for a 4th jar if needed!


 For the topping you will need: 
1/4 cup brown sugar 
1/4 cup all-purpose flour 
1/4 teaspoon ground cinnamon 
2 tablespoons oats 
3 tablespoons cold butter

Mix the flower, sugar and cinnamon in a large bowl.  Cut in the cold butter.  Once it is well integrated, stir in the oats.
 

This is a handy little thing used to cut cold butter into a recipe.  You use it much like a potato masher but rock it side to side to integrate the butter.  If you don't have one you can literally cut the butter in with two knives using a cutting motion away from each other.


Then sprinkle the topping on top of the apple mixture in the jars.  I made my topping layer about 1 inch deep.


Notice how I didn't say anything about preheating your oven.  That is because you will actually preheat the oven with the jars inside so the glass doesn't heat too quickly.  Use a cookie sheet in case of overspill.

Set oven to 375 and let bake for 45-60 minutes.  You want the topping to be nice and brown and bubbly!


Now for the decorating!  I used my lids as guides.  I used about an inch-and-a-half over the size of the lid.  If mine had been sharp, I would have used pinking shears... oh well!
The nice thing about the canning jars is the lids come apart so they are very easy to decorate!


I put hot glue on the inserts to hold down the fabric.
 

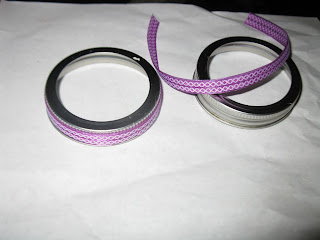
 Then you can decorate the rim of the lid however you would like!  I used ribbon and some fun fabric flowers!

Hot glue worked best to hold down the ribbon and the flowers.


Once the crisps are cooled completely you can put them all together.  As you can see here, I made little cards from some festive paper I had.  I just punched a hole in the corner of the card and looped a piece of thin ribbon through the hole and around the lid rim.

See how much the cooked down!  Definitely going to fill them up all the way next time!


I didn't have Lex help me with this one because she wasn't with me that week, but this is something she would have loved helping out with!  Hope you all enjoy this project as much as I did!  AND it was a hit with the teachers too!

Wednesday, April 4, 2012

Egg Coloring- Part Two

Silk- Tie Eggs

This project was a little more tricky and Allexxa didn't really get involved much except for unwrapping the eggs at the very end.  I do have to say these turned out incredible and they seem to be addicting!

Ok, for this project you will need 100% silk fabric.  I used ties that I got from the thrift store, but you could use blouses or scarves or any such nonsense, as long as it is 100% silk.
 

 All you need is the fabric itself so if you use ties, you will need to rid yourself of the lining and other fabric.  A short photo walk-through of deconstructing a tie folows:


You then take RAW EGGS, and wrap them up in in the silk with the "good side" facing the egg, securing it with a twist tie.  The pattern is going to transfer where the silk is actually touching the egg, so think about where you want the clearest pattern to be.  I chose the horizontal orientation so that the bulk of the pattern was on the largest portion of the egg.  You choose what you like best! 
 

After they are all wrapped in their silk jammies, you will need to cover those with a thin light colored material.  I used a Dollar Tree tee-shirt that I cut into squares.  To secure it, rubber-bands worked the best for me, as the twist ties I had were too small.
 

Once they are all double wrapped you want to place them in a pan filling it with cold water to cover the eggs.  (Note: the "tails" will probably be sticking out) Then add 1/4 cup of white vinegar and bring to a boil.


Boil them for 20 minutes, then remove them with tongs and place on a towel or wire rack to cool.


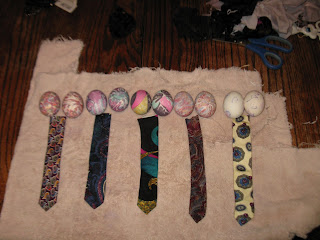
Once they are cool enough to handle, you can unwrap them!  This is by far the most addicting part! Below are the eggs we colored with a piece of the tie that was used underneath.  The eggs on the left of each pair have the "right side" or the smooth side of the silk up.  The eggs on the right side of the pair have the twist-tie side up.


  These are a couple of my favorites up close!


 Hope you have as much fun with this as i did!  Good luck and I hope everyone has a wonderful Spring!

 Egg Coloring- Part One

Marbled Eggs!


I am trying to stick with my once-a-week commitment here, but I am going to cheat and do 2 this week!


I have always been completely un-impressed with the way dyed eggs turn out.  It is super messy and, lets face it, pretty boring.  Allexxa had a BLAST with these eggs and they turned out wonderful with barely any clean-up!  The best part is the only thing I had to buy (besides eggs) was the shaving cream, for a dollar at the Dollar Tree!

All you really need to set up for these is wire cooling racks, cake or jelly roll pans (you can use one, I chose two because of time constraints,) shaving cream, white vinegar, and food coloring.


First I placed the hard boiled eggs in a shallow pan with white vinegar and rolled them around for a couple minutes.  Make sure they are dry before you start.  I then filled the pans with a thick layer of shaving cream and let Allexxa dot the shaving cream with food coloring.


At this point you can use a toothpick to "marble" the shaving cream by dragging it across the top, but I found this step completely unnecessary.

I did find some cute egg tongs for her to use so that the food color stayed off her hands.  She placed the egg in the pan with the shaving cream and food coloring and then pushed it around with the tongs until she thought there was enough color on it.  


 Then I had her pick up the egg with her tongs and put it on the cooling rack.  This was her favorite part.  She said they didn't look like eggs but like creatures!


That is basically the whole process.  Once they dry an hour or so, rinse them under cold water and let them dry again.  Then they are ready for the giant creepy rabbit!

Below are a few examples of how ours turned out (with the neon liquid food coloring!)  If anybody tries it, let me know!  I would LOVE to see pictures of how yours turned out!


Monday, March 26, 2012

Rapunzel Doll Cake

First off, I would like to mention what a pain-in-the-behind this cake was.  I thought I was BRILLIANT and could do this in one afternoon with a bundt-cake pan and a cheap doll.  Boy was I ever wrong!  I started out with two boxes of cake mix,  two cans of frosting, cooking spray, flour, food coloring and white chocolate chips for decorating. 
It quickly turned into 4 boxes of mix and 3 cans of frosting.  This is NOT a small cake.  I used a fancy pan that is called a "tube pan."  This type of pan is normally used for Angel-food cake, but it worked great for this!


 I first greased the pan with cooking spray and then used foil to cover the opening in the bottom of the pan (I was out of parchment paper, but that would probably work much better.)


Then I sprayed the rest of the pan and floured it well.  The cake REALLY wanted to stick to this pan!  I had to use three of these to get the correct height for the doll.  You could do the same thing with 6 9-inch round pans but the hole from the tube works so well!

For between the layers I used fresh sliced strawberries and a filling of cream cheese frosting mixed with strawberry puree.  I would only use half a basket of berries to a can of frosting.  I made WAY too much and had a huge bowl left and nothing to use it for.


Once I sliced the strawberries I arranged them in a single layer on top of the cooled, leveled first layer.  


Then I poured on a bit of the filling.  It is quite sloppy so avoid going too close to the edge!


As I got closer to the top, I left more of an edge so that I would be able to trim the cake to the correct shape.  

I also took a cardboard paper-towel tube and cut it to the correct height of the doll's skirt.  I wanted to be able to use the top of the dress without getting frosting everywhere.  I would have used frosting on a naked doll, but  I am awful at piping something as detailed as a dress bodice on a tiny doll.

I also used plastic wrap to keep the doll's hair out of the way while I was working with it.  


I got tired at this point and stopped taking quite so many photos.  Sorry.  Basically I just trimmed the cakes until they were roughly the correct shape and then piped on the tinted frosting. I used the white chocolate chips as details. 
 

 If you look in the center of the cake you can see the cardboard tube where the fully dressed doll can sit without getting gross.


Here are the white chocolate chip "flowers" around the sides and back of the skirt.
 

This shows the finished skirt with the doll installed; the hair is still wrapped because the frosting hasn't set yet.  A few hours in the fridge puts a nice shell on the frosting so it doesn't get into the hair.
 

The completely finished product!  Hope I helped someone out.  All I know is it was a hit with my 5-year old, which made the whole thing worth it!


Thanks for reading!